Practical guides to AI, computing, modelling, simulation, optimization and quantum computing, featuring hands-on tutorials, experiments and research.

Vibe Coding the Knight’s Tour with OpenAI Codex CLI

Vibe Coding with OpenAI Codex CLI

A hands-on vibe coding session: scaffolding, solving, testing, and visualising the classic Knight’s Tour chess problem using OpenAI’s Codex CLI, guided entirely through natural language prompts rather than hand-written code.

“Vibe coding” — Andrej Karpathy’s term for building software by describing what you want in plain English and letting an AI agent write the code — has gone from a throwaway phrase to Collins Dictionary’s Word of the Year. This post is a real vibe coding session with OpenAI’s Codex CLI: no line of Python below was typed by hand. This post assumes you have Codex CLI installed and authenticated. We’ll be working in three phases, each driven by a carefully crafted Codex prompt.

🎧 Is this actually vibe coding? By the loosest definition — describing intent in natural language and letting AI generate the code — yes. But 2026’s usage has split into a spectrum. On one end sits “slop coding”: accepting whatever the agent produces with no review, which is how vibe-coded side projects rack up technical debt fast. On the other end is what this post demonstrates — natural-language prompts plus a standing AGENTS.md spec, a diff to review before every write, and a test suite the agent has to satisfy. Same vibe, considerably less slop.
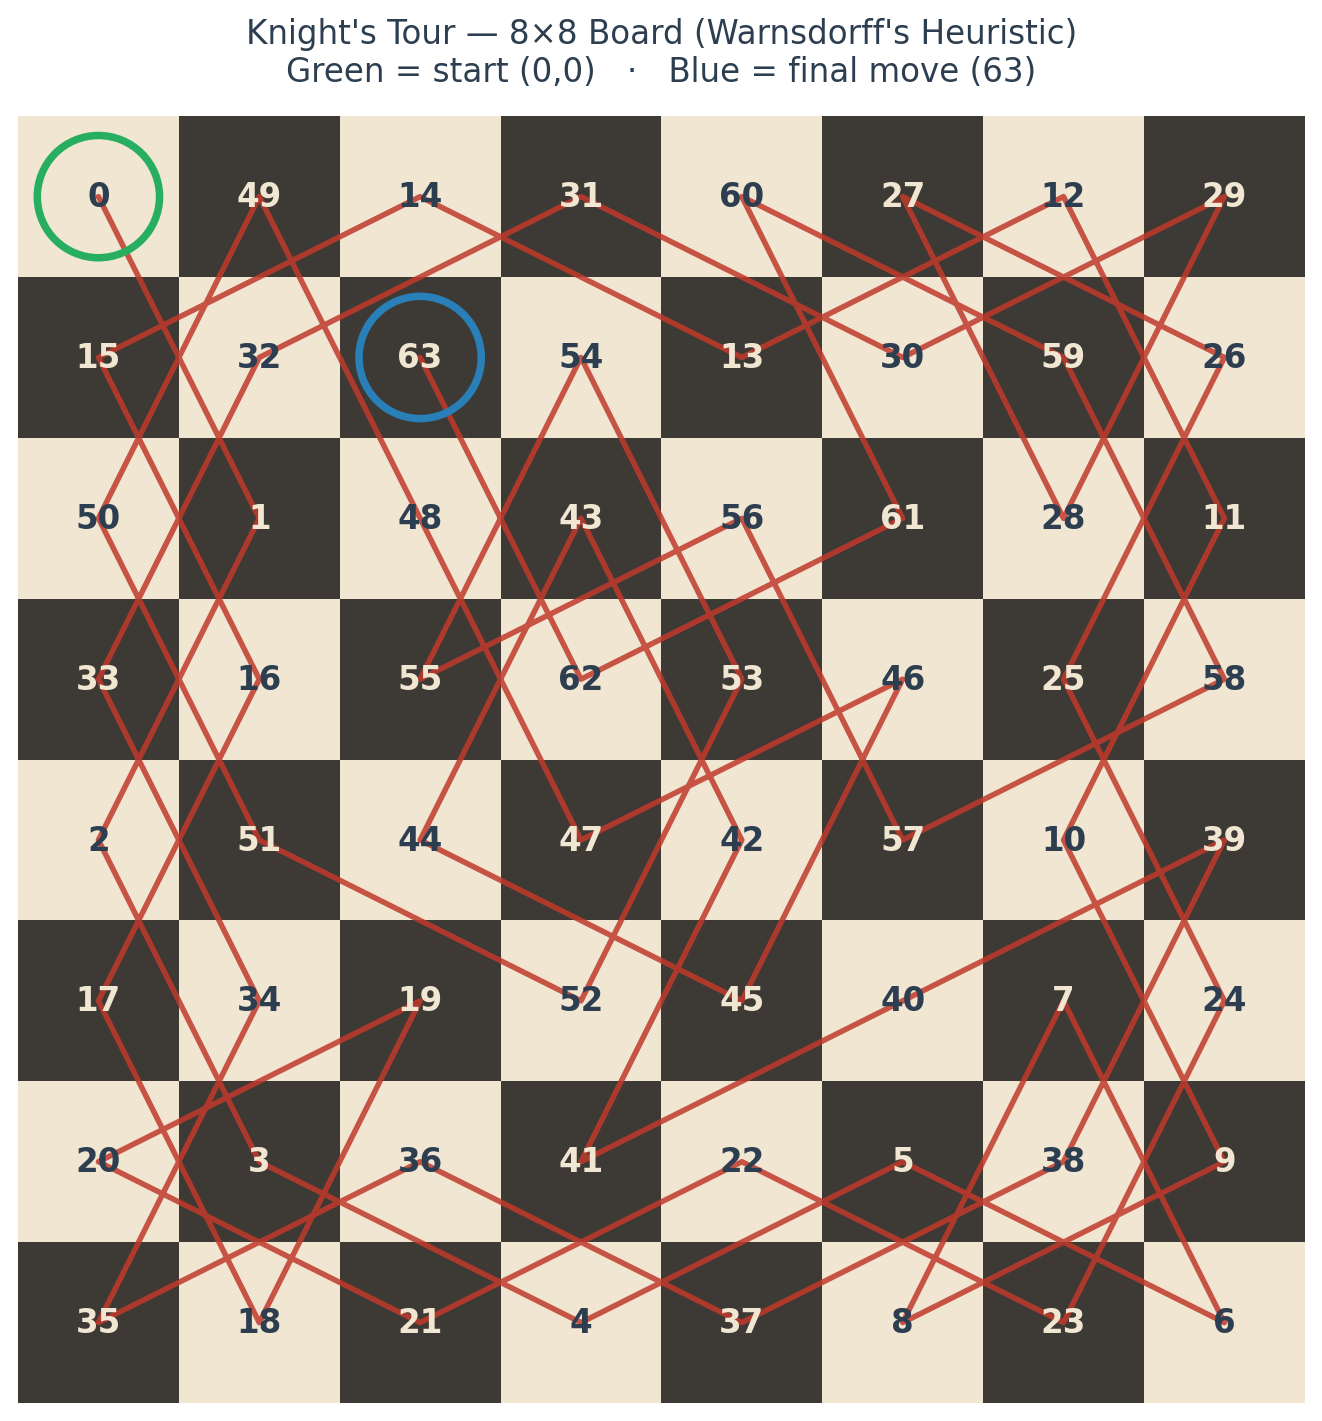
Completed 8×8 Knight's Tour board generated by the Warnsdorff solver, showing move order numbers and the knight's path traced across the board

The completed tour from this walkthrough’s own solver — the full 8×8 board, all 64 moves, generated by the exact code Codex wrote below.

♞ What is the Knight’s Tour Problem?

The Knight’s Tour is a classic puzzle from combinatorics and graph theory: given an n×n chessboard and a knight placed on any starting square, can the knight visit every square on the board exactly once using only valid knight moves? A knight moves in an L-shape — two squares in one direction and one square perpendicular, giving it up to eight possible moves from any position.

The problem has been studied for over a thousand years. Arab mathematicians documented it as early as the 9th century, and Leonhard Euler conducted a systematic mathematical analysis in 1759. There are two variants: an open tour, where the starting and ending squares differ, and a closed (re-entrant) tour, where the knight can return to its starting square in one move. On the standard 8×8 board, there are over 26 trillion distinct open tours.

From an algorithmic standpoint, the Knight’s Tour is a special case of the Hamiltonian path problem on a graph, where each square is a node and edges connect squares reachable by a knight move. Finding a Hamiltonian path is NP-complete in general, but the regular structure of the chessboard makes efficient heuristics possible.

The most well-known heuristic is Warnsdorff’s rule (H.C. von Warnsdorff, 1823): at each step, move to the unvisited square that has the fewest onward moves. This greedy approach runs in linear time relative to the number of squares and finds a tour almost always on boards of size 5×5 and above — which is exactly what we’ll ask Codex to implement.

🗺️ What We’re Building

By the end of this walkthrough, we’ll have a fully working Python application with three layers built up incrementally through Codex prompts:

PhaseWhat Codex BuildsOutput
Phase 1Core solver using Warnsdorff’s heuristicCLI app, ASCII board output
Phase 2Pytest test suite and colourised terminal outputANSI colour board, passing tests
Phase 3Flask web app with animated HTML canvasInteractive browser visualisation

⚙️ Prerequisites

Before starting, make sure you have:

  • Codex CLI installed (brew install --cask codex or npm i -g @openai/codex)
  • Authenticated with a ChatGPT Plus/Pro account or an OpenAI API key
  • Python 3.10+ available in your shell
  • Git installed on your machine (see Project Setup below if you haven’t configured it yet)

📁 Project Setup

We’ll use Git throughout this guide as a safety net — you can git diff to review what Codex changed, or revert entirely if a phase goes wrong. If this is your first time using Git on this machine, configure your identity first:

git config --global user.name  "Your Name"
git config --global user.email "[email protected]"

This only needs to be done once. To verify your settings at any time:

git config --global --list

Now create the project directory, initialise the repo, and add an empty conftest.py in the root. The conftest.py file signals to pytest that the project root is the base directory, which allows it to resolve imports like from knight_tour import solve correctly from within the tests/ subdirectory:

mkdir knights-tour && cd knights-tour
git init
touch conftest.py
git commit --allow-empty -m "initial commit"

With the repo ready, launch Codex from inside the project directory:

codex

Once the TUI loads, your very first prompt should be to generate an AGENTS.md file. This acts as a standing project-level system prompt — Codex reads it automatically at the start of every future session, so you don’t have to repeat your conventions each time.

📝 Codex Prompt — Generate AGENTS.md

“Create an AGENTS.md file in the project root for a Python CLI and web application project. Include the following standing instructions: use Python 3.10+ with type hints throughout; place all tests in a /tests directory using pytest; never use global mutable state; prefer functions over classes unless OOP is genuinely the better fit; handle all CLI arguments with argparse; use Flask for any web routes; keep each module focused on a single responsibility. Format it as a markdown file with a brief intro line followed by a bullet list.”

Codex will create the file and show you the diff to review. Accept it, then commit before moving to Phase 1. Every subsequent Codex session in this directory will pick up these rules automatically.

💡 Why prompt Codex to write AGENTS.md instead of writing it yourself? Two reasons. First, you describe your intent conversationally rather than worrying about format. Second, it sets the right mental model for the rest of the guide — Codex writes the files, you review the diffs.

You can also update it at any time: “Add a rule that all functions must have docstrings” or “Update AGENTS.md to say we’re now using FastAPI instead of Flask” — Codex will edit the file in place and show you the diff.

Phase 1 — Core Solver

Still in the same Codex session, enter the Phase 1 prompt. Codex already has the project context from AGENTS.md, so you can get straight to the point:

📝 Codex Prompt — Phase 1

“Create a Python CLI app that solves the Knight’s Tour problem. Use Warnsdorff’s heuristic: at each step, move to the unvisited square with the fewest onward moves. The board size and starting position should be configurable via argparse using the argument names –size (default 8), –row (default 0), and –col (default 0). Do not use single-letter short flags. The solver should return None if no tour is found. Display the completed board as a grid of move numbers, right-aligned. Save the solver logic in knight_tour.py and the entry point in main.py. Include a requirements.txt (even if empty for now) and a .gitignore for Python.”

Codex will show you its plan before making any changes. In Auto mode, you’ll see it create each file with a diff preview. Here’s a simplified version of what the generated knight_tour.py looks like:

MOVES = [(2,1),(2,-1),(-2,1),(-2,-1),(1,2),(1,-2),(-1,2),(-1,-2)]

def get_neighbours(x, y, n, visited):
    return [(x+dx, y+dy) for dx,dy in MOVES
            if 0 <= x+dx < n and 0 <= y+dy < n
            and not visited[x+dx][y+dy]]

def solve(n, start_x, start_y):
    visited = [[False]*n for _ in range(n)]
    board   = [[-1]*n   for _ in range(n)]
    x, y = start_x, start_y
    visited[x][y] = True
    board[x][y]   = 0
    for move in range(1, n*n):
        neighbours = get_neighbours(x, y, n, visited)
        if not neighbours:
            return None
        x, y = min(neighbours,
                   key=lambda p: len(get_neighbours(p[0],p[1],n,visited)))
        visited[x][y] = True
        board[x][y]   = move
    return board

Run it in a separate terminal to verify:

python3 main.py --size 8 --row 0 --col 0

You should see a numbered 8×8 grid where each number represents the move order of the knight. Commit the result before moving to Phase 2.

💡 Approval Flow: In Codex’s default Auto mode, you’ll see a diff for each file before it’s written. Press A to accept or R to reject. If Codex proposes something you don’t want, reject it and follow up with a corrective prompt — it retains full context.

Phase 2 — Tests & Colourised Output

In the same Codex session, enter the next prompt. You don’t need to re-explain the project — Codex still has full context from Phase 1.

Before entering the prompt, install pytest in a separate terminal. Codex will attempt to run the test suite as part of its workflow, so the package must be present beforehand:

pip3 install pytest
📝 Codex Prompt — Phase 2

“Now add two things. First, create a test suite in tests/test_knight_tour.py using pytest. Test that: (1) solve() returns a valid tour where every integer from 0 to n²−1 appears exactly once, (2) consecutive moves are a valid knight’s move apart, (3) solve() returns None for n=2 which has no solution. Second, add a new function print_coloured_board() in knight_tour.py that uses ANSI escape codes to colour the board — alternate between a light and dark background for a chess-style pattern, with white text for the move numbers. Call it from main.py instead of format_board() when –colour flag is passed.”

Codex will generate the test file and extend knight_tour.py with the colour function. Key tests:

import pytest
from knight_tour import solve

def is_valid_knight_move(x1, y1, x2, y2):
    dx, dy = abs(x2-x1), abs(y2-y1)
    return (dx, dy) in {(1,2),(2,1)}

@pytest.mark.parametrize("n,r,c", [(5,0,0),(6,1,1),(8,0,0),(8,3,4)])
def test_valid_tour(n, r, c):
    board = solve(n, r, c)
    assert board is not None
    flat = sorted(v for row in board for v in row)
    assert flat == list(range(n*n))

def test_no_solution_n2():
    assert solve(2, 0, 0) is None

Run the tests in a separate terminal to verify. If you created conftest.py in the project root during setup, pytest will resolve imports correctly:

pytest tests/ -v

If you see a ModuleNotFoundError: No module named 'knight_tour', use the module invocation instead, which explicitly adds the project root to sys.path:

python3 -m pytest tests/ -v

And try the colour flag:

python3 main.py --size 8 --colour

Phase 3 — Flask Web App with Animated Visualisation

Now we go beyond the terminal. In the same session (or a fresh one — Codex resumes from codex resume --last), enter the Phase 3 prompt:

📝 Codex Prompt — Phase 3

“Add a Flask web app in app.py. It needs two routes: GET / serves a single-page HTML form where users can input board size (5–10) and starting row/col. POST /solve accepts these inputs, runs the solver, and returns the board as JSON. The HTML page should also contain a JavaScript canvas visualisation that animates the knight’s path one move at a time when the solution arrives — draw the board as a grid, colour visited squares progressively, and draw a ♞ symbol on the current square. Add flask to requirements.txt.”

Codex generates app.py and embeds the full HTML/JS using Flask’s render_template_string. The key backend endpoint:

from flask import Flask, request, jsonify, render_template_string
from knight_tour import solve
app = Flask(__name__)

@app.route("/solve", methods=["POST"])
def solve_tour():
    data = request.get_json()
    n, row, col = int(data.get("size",8)), int(data.get("row",0)), int(data.get("col",0))
    if not (5 <= n <= 10):
        return jsonify({"error": "Board size must be between 5 and 10"}), 400
    board = solve(n, row, col)
    if board is None:
        return jsonify({"error": "No solution found"}), 422
    return jsonify({"board": board, "n": n})

Install Flask and run:

pip3 install flask
python3 app.py

Visit http://localhost:5000, choose your board size and starting square, hit Solve, and watch the knight’s path animate across the canvas.

🔄 Iterating Further — More Prompt Ideas

Once your three-phase app is working, you can keep iterating in the same session. Here are some prompts to take it further:

GoalFollow-up Prompt
Speed comparison“Add a backtracking solver as an alternative to Warnsdorff’s. Add a –solver flag to switch between them, and time both with Python’s timeit.”
Export result“Add a –export flag to main.py that saves the board as a CSV and also renders it as a PNG using matplotlib, with the knight path drawn as a line.”
User clicks board“Update the web app so users click a cell on the canvas to set the starting position instead of using the form fields.”
Code review“Review the current codebase for edge cases, type annotation completeness, and any issues with the input validation in app.py.”

✅ Effective Prompting Tips for Codex

A few patterns that made a noticeable difference in the quality of output across this walkthrough:

TipWhy It Helps
Name your files explicitlyCodex won’t guess at naming conventions. Saying “save to knight_tour.py” prevents it from choosing arbitrary filenames.
Specify what None/failure meansWithout “return None if no tour is found,” Codex might raise an exception instead — a valid choice but harder to test.
Bundle related changes in one promptPhase 2 added tests and colour output together. Codex handles multi-file tasks well when given in a single cohesive prompt.
Keep sessions alive for follow-upsDon’t exit and re-enter. Staying in the same session means Codex retains full context — you can make corrections without re-explaining the project.
Use AGENTS.md for standing rulesAnything you’d say in every prompt belongs in AGENTS.md. It keeps prompts shorter and ensures consistent style across sessions.

📁 Final Project Structure

knights-tour/
├── AGENTS.md
├── conftest.py           ← empty, anchors pytest to project root
├── .gitignore
├── requirements.txt      ← flask
├── knight_tour.py        ← solver + display logic
├── main.py               ← CLI entry point
├── app.py                ← Flask web app
└── tests/
    └── test_knight_tour.py

What’s worth noticing in this walkthrough is the workflow rhythm: each Codex prompt builds on the last without re-explaining context, and the AGENTS.md file silently enforces project conventions so you don’t have to. The three phases took roughly 15 minutes end-to-end, most of which was reviewing diffs and running tests rather than writing code — not a single line was typed by hand.

The Knight’s Tour is just the illustration. The same prompt-iterate-commit loop applies to any project — and the more you invest in a good AGENTS.md upfront, the more useful each Codex session becomes.

This is what vibe coding looks like once it graduates past the demo-day stunt: still driven entirely by natural language, still fast, but with a spec file, a diff review, and a test suite standing between “the agent wrote it” and “it shipped.”

Another Codex CLI workflow: See how to run Codex from Termux on Android and connect it to WordPress.com.

Choosing hardware for local AI? Compare the Mac Mini M4 and Mac Studio for local LLMs, including tested 1B, 8B and 14B performance.

Comments

8 responses to “Vibe Coding the Knight’s Tour with OpenAI Codex CLI”

  1. What is Agentic Workflow? Discover How AI Enhances Productivity – Techucation Avatar

    […] Vibe coding with OpenAI Codex CLI — an end-to-end agent-assisted coding project. […]

    Like

  2. Claude Code overview – Anthropic – Techucation Avatar

    […] Related AI workflow: Claude Code can be extended beyond coding with reusable tools and workflows. See how to build a reusable Claude API skill, or compare the approach with a hands-on OpenAI Codex CLI project. […]

    Like

  3. Quick Guide to GIT – Techucation Avatar

    […] Related AI workflow: Git is central to AI-assisted software development because it keeps agent-generated changes reviewable and reversible. See it in practice in this OpenAI Codex CLI Knight’s Tour project. […]

    Like

  4. Introduction to Python Virtual Environments – Techucation Avatar

    […] Related guide: Virtual environments keep AI-generated Python dependencies isolated and reproducible. See that workflow in a hands-on OpenAI Codex CLI project. […]

    Like

  5. Quick Guide to Docker – Techucation Avatar

    […] Related guide: Containers provide reproducible environments for AI-assisted development. See Docker and version control used in a hands-on OpenAI Codex CLI project. […]

    Like

  6. How to Connect Codex to WordPress.com and Post from Termux on Android – Malcolm Low | Practical AI, Simulation & Quantum Computing Avatar

    […] a complete Codex project? Follow the hands-on Knight’s Tour project with Codex CLI, including scaffolding, tests and diff […]

    Like

  7. Optimization Problems Explained: Traveling Salesman, Job Shop Scheduling, and the Knight’s Tour – Malcolm Low | Practical AI, Simulation & Quantum Computing Avatar

    […] Knight’s Tour walkthrough on this blog treats the problem as a coding exercise: implement Warnsdorff’s heuristic, watch […]

    Like

  8. Mac Mini M4 vs Mac Studio for Local LLMs: AI Benchmarks – Malcolm Low | Practical AI, Simulation & Quantum Computing Avatar

    […] Delivers exceptional performance with near-instantaneous 203 ms response time. Excellent for hands-on Codex CLI coding workflows, content creation, and other interactive […]

    Like

Leave a comment